Docker: A primer for PHP Developers
Our goal is to study how to set up a local Windows Dockerised Laravel (latest version) environment.
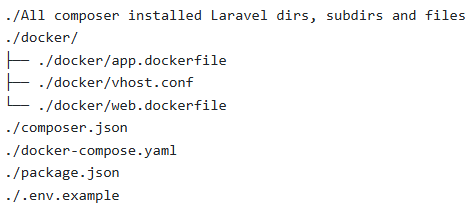
As I will continually keep referring to directories, subdirectories and files by name, I encourage you
to keep the following
files and directories tree structure in mind.
In our study of this dockerised Laravel setup, we will look at four fundamental components of Docker in details:
1. Docker services
2. Docker compose
3. Docker volumes
4. Docker environment variables
Step 1: (Windows installation) Download and install Docker
All steps
Step 2: Download Laravel using Git
1) First, download and install composer and git (if not already done):
Install composer
Install git
2) Clone Laravel latest release
git clone https://github.com/laravel/laravel.git
Step 3: Install Composer Image
Developing our Laravel application will require us to install dependencies
through Composer to exploit specific
features of the framework.
Docker Composer Image allows us to run a command which (1) creates a new container,
(2) passes arguments
to this container and (3) removes itself after it has performed its work.
The command:
$ docker run --rm -v ${pwd}:/app composer install-v ${pwd}:/app: -"v" stands for "volume", "pwd" stands for "current working directory". We tell Docker to install all Docker Composer Image files inside the 'app' directory. The -v (for "volume") flag is used to mount application files and application directories (here Laravel 'app' directory) to a container. Various files and directories in an application can be mounted to various containers.
--rm: This tells the container to remove ('--rm') itself after it has finished doing what it does. Docker Composer Image is no longer needed.
More on Docker Composer Image
More on Docker Volumes
Step 4: Create a docker-compose file
A Docker Compose file is the file used to define and run a multi-container application.
In our Docker Compose YAML file, we configure all the application services
our application requires.
Before we take a look at docker-compose.yaml, we ask:
What are Docker services ?
According to Docker documentation, "a service is a unit of deployment that defines which
container image to use, which
commands to execute inside the container, and other options such as:
- The port where the service is accessible
- The network where the service connects to other services
- The CPU and memory limits for the service"
For our dockerized Laravel installation, we will implement the following five services:
1. PHP-FPM Process Manager* (Application layer)
2. Nginx* (Web layer)
3. MySQL* (Database layer)
4. Mailhog** (Mailing layer)
5. PhpMyAdmin** (Database management layer)
* required
** optional
Strategy:
The full docker-compose.yaml file can be found below.
To really make sense of the code, I added a number of remarks below for explanation which
refer to line numbers in the
code.
version: '3.8'
services:

    # PHP-FPM Process Manager Service Config (Application Layer)
    app:
        build:
            context: ./docker
            dockerfile: app.dockerfile
        working_dir: /var/www
        volumes:
            - ./:/var/www
        depends_on:
            - "database"
    # Nginx Web Server Service Config (Web layer)
    web:
        build:
            context: ./docker
            dockerfile: web.dockerfile
        working_dir: /var/www
        volumes:
            - ./:/var/www
        depends_on:
            - "app"
        ports:
            - 80:80
    # MySQL Service Config (Database layer)
    database:
        image: mysql:9.1.0
        volumes:
            - dbdata:/var/lib/mysql
        environment:
            MYSQL_DATABASE: ${DB_DATABASE}
            MYSQL_ROOT_PASSWORD: ${DB_PASSWORD}
            MYSQL_PASSWORD: ${DB_PASSWORD}
            MYSQL_USER: ${DB_USERNAME}
        ports:
            - 33061:3306
    # PhpMyAdmin Service Config (Database management)
    pma:
        image: phpmyadmin:5.2.1
        environment:
            - PMA_ARBITRARY=1
            - PMA_HOST=${DB_HOST}
            - PMA_USER=${DB_USERNAME}
            - PMA_PASSWORD=${DB_PASSWORD}
            - PMA_PORT=${DB_PORT}
        depends_on:
            - database
        ports:
            - 8888:80
    # Mailhog Server Service Config (Mailing layer)
    mailhog:
        image: mailhog/mailhog
        logging:
            driver: 'none'
        ports:
            - 1025:1025
            - 8025:8025

volumes:
    dbdata:
General
(line 1) version:
The Docker Compose version used (here 3.8).
Docker Swarm
can only be used with Compose
version 3, not 2.
(line 2) services:
Instances of images or images, i.e: our five services, will be listed here.
PHP-FPM Process Manager Service
We use PHP-FPM as an application layer for our web server Nginx to be able to handle PHP client requests
and
application code alltogether.
Apache instead of Nginx can be used as a web server. However, Nginx is better overall at handling static content
and
high traffic volumes.
We will look at our configuration of PHP-FPM app.dockerfile image later. It calls gd Image processing
library and
imagick Image processing library.
(line 6) build:
Allows Docker Compose to know which set of files should be accessed by the build.
(line 7) context:
The relative path to our Dockefile: app.dockerfile. In our case, app.dockerfile
is located in
the docker directory.
(line 8) dockerfile:
app.dockerfile is discussed below.
(line 9) working_dir:
The directory where the container PHP-FPM Process Manager operates and
performs tasks
(line 10) volumes:
The container (here the '/var/www' directory) to which we mount the directory in which
our
docker-compose.yaml file is located. The web server therefore knows where to look for the
application files needed to run the application.
(line 12) depends_on:
Makes sure that another service (here the database container) is running before the
application container starts.
Nginx Service
For reasons outlined earlier, we choose to use Nginx over Apache as our web server.
(line 16) build:
Starting line for this service which lets Docker Compose know the location
of the dockerfile
relative to docker-compose.yaml.
(line 17) context:
It points to web.dockerfile, the required Dockerfile for this service. We will later
look at a file
called by web.dockerfile: vhost.conf. This virtual host file enables Nginx websites on a single
server.
(line 18) dockerfile:
web.dockerfile is discussed below.
(line 19) working_dir:
The directory where the Nginx container operates and performs tasks
.
(line 20) volumes:
The container (here the '/var/www' directory) to which we mount the directory in which our
docker-compose.yaml file is located. The files needed by Nginx to run properly are in this
directory.
(line 22) depends_on:
Nginx Server needs PHP-FPM Process Manager Service to work in order to handle
multiple
simultaneous client requests, for example.
(line 24) ports:
We are defining which port our container is exposing externally and to which container
internal port this external port is mapped to. The ports naming convention is:
[external-port]:[internal-port].
MySQL Service
MySQL Service acts as the database layer and separates the application PHP code commands
from queries to the
database.
(line 28) image:
Unlike the PHP-FPM service and Nginx service, we want MySQL Service to
build the
image directly from
Docker Hub Container Image Library
.
Depending on the application
requirements, we choose which MySQL tag release version we need to use.
(line 29) volumes:
We use the dbdata named volume (unlike the anonymous volumes used for PHP-FPM and
Nginx) to be
able to persist files after the container has stopped. The container can be
restarted anytime and the database will automatically be restored to its previous state.
(line 31) environment:
The listed 'key value' pairs act as environment variables which allow the container to
communicate with mysql database. ${DB_DATABASE}, ${DB_PASSWORD}, ${DB_PASSWORD}
and ${DB_USERNAME}
are just aliases. docker-composer.yaml looks for a default project
configuration file containing those parameters in the context directory, i.e: the
project root
directory in our case. For Laravel, this configuration file is .env.example which
we will rename .env.
(line 36) ports:
Similarly to the Nginx service, we map MySQL container external port 33601 to its internal
port 3306.
Mailhog: Development Mailing Server Service
Laravel provides API based drivers which enable sending and receiving emails.
Among various Docker email testing tools (Minio, Mailpit), we choose Mailhog for its portability,
its simplicity and
configure it.
(line 53) image:
We follow Docker generic command:
docker image tag SOURCE_IMAGE[:TAG] TARGET_IMAGE[:TAG]
to build an image residing in a public repository and adapt it for mailhog.
(line 54) logging:
By default, mailhog stores logs in logs/mailhog.log. Since they take up of a lot of
resources, we set mailhog logging driver to 'none'.
(line 56) ports:
The first set of ports (1025:1025) is used by the web-based user interface.
The second set of ports (8025:8025) is used by SMTP server.
PhpMyAdmin Service
PhpMyAdmin
can be used as a GUI interface to manage databases and tables,
(line 40) image:
We build phpmyadmin:5.2.1 image from its official
Docker Hub repository
(line 41) environment:
As for MySQL Service earlier, we retrieve environment variables from Laravel .env file.
This will let us connect to PhpMyAdmin without having to enter authentication details
every time.
(line 47) depends_on:
For PhpMyAdmin to be used, MySQL server has to be running. PhpMyAdmin as a
service relies therefore on the database container.
(line 49) ports:
This container port 8888 connects to our web interface and the container server listens
to mysql server on port 80.
Step 5: Coding the two Dockerfiles
A Dockerfile specifies how Docker should build a Docker image.
A Docker Compose file is used to tell Docker how to run Docker containers.
Our first Dockerfile is PHP-FPM 'app' container app.dockerfile (line 8 above).
It runs:
- (line 1 below) the PHP-FPM processor
- (line 9 below) the GD Image processing library
- (line 10 below) pdo_mysql: the driver which enables access to MySQL databases from PHP via
PHP Data Objects (PDO)
FROM php:8.0-fpm

RUN apt-get update && apt-get install -y  \
    libfreetype6-dev \
    libjpeg-dev \
    libpng-dev \
    libwebp-dev \
    --no-install-recommends \
    && docker-php-ext-configure gd --with-freetype --with-jpeg \
    && docker-php-ext-install pdo_mysql -j$(nproc) gd
Our second Dockerfile is Nginx 'web' container web.dockerfile (line 18 in docker-compose.yaml file).
It runs:
- (line 1 below) nginx 1.27.2: The official image of the reverse proxy server Nginx.
- (line 3 below) vhost.conf: The /docker/vhost.conf file is copied and overwrites the /etc/nginx/conf.d/default.conf, Nginx default file.
(NOTE : vhost.conf is explained below.)
- (line 5 and 6 below) stdout: We create a symlink between (1) Nginx standard output and (2) Nginx access.log file as well as Nginx error.log file.
FROM nginx:1.27.2

COPY vhost.conf /etc/nginx/conf.d/default.conf

RUN ln -sf /dev/stdout /var/log/nginx/access.log \
	&& ln -sf /dev/stderr /var/log/nginx/error.log
The vhost.conf file
The vhost.conf file provides a mechanism as a virtual host to allow more than one
website on one system or one web
server such as Nginx or Apache.
I added some comments about vhost.conf configuration directly into the code below.
server {
    listen 80; # forces Nginx web server to listen on port 80
    index index.php index.html; # our web server index file is either index.php or index.html
    root /var/www/public; # Nginx server root directory

    location / {
        try_files $uri /index.php?$args;
    }

    location ~ \.php$ {
        fastcgi_split_path_info ^(.+\.php)(/.+)$;
        fastcgi_pass app:9000; # where PHP-FPM 'app' service executes the CGI script, PHP in our case.
        fastcgi_index index.php;
        include fastcgi_params;
        fastcgi_param SCRIPT_FILENAME $document_root$fastcgi_script_name;
        fastcgi_param PATH_INFO $fastcgi_path_info;
    }
}
Step 6: Configuring Laravel .env file
Laravel default .env.example generated during Laravel composer installation has to be renamed .env and would typically look the following:
DB_HOST=127.0.0.1
DB_DATABASE=docker-database
DB_USERNAME=docker-user
DB_PASSWORD=docker-password

MAIL_HOST=mailhog
MAIL_PORT=1025
Step 7: Start the containers - Build the images
$ docker-compose upBefore we can call the index page of our Laravel application, there are still two last steps we need to take:
1. To implement Laravel's application security and encryption features, generate a new 32-character string APP_KEY value in the .env file.
2. Run a Laravel command to create a compiled file of Laravel most used classes. This compiled file reduces the total number of files which have to be called by Laravel each time a request is made to the server.
We use docker-compose exec to run the following two Laravel commands inside our existing and running 'app' container:
$ docker-compose exec app php artisan key:generate$ docker-compose exec app php artisan optimizehttp://localhost - To view our Laravel application index page.
http://localhost:8888 - To view phpMyAdmin.
http://localhost:8025 - To view MailHog UI URL.